
Lunch doesn’t have to be boring, and sometimes the best meals are born from improvisation. That’s exactly why the Kitchen Sink Sandwich has gone viral on TikTok. Millions of people are taking whatever they have in their fridge, piling it onto bread, and turning it into a flavor-packed, no-waste lunch.
I first saw the trend scrolling one evening. A creator layered chicken, avocado, chips, and pickles between two slices of toasted sourdough, and the video had racked up millions of views. The name caught me “everything but the kitchen sink” and it made sense. This isn’t just a recipe, it’s a playful way to eat well without overthinking.
In this post, I’ll break down what makes the Kitchen Sink Sandwich so appealing, show you how to build it at home, and give you plenty of variations to fit your mood. Whether you’re meal prepping, cleaning out your fridge, or just craving something fun, this sandwich delivers.
What is the Kitchen Sink Sandwich?
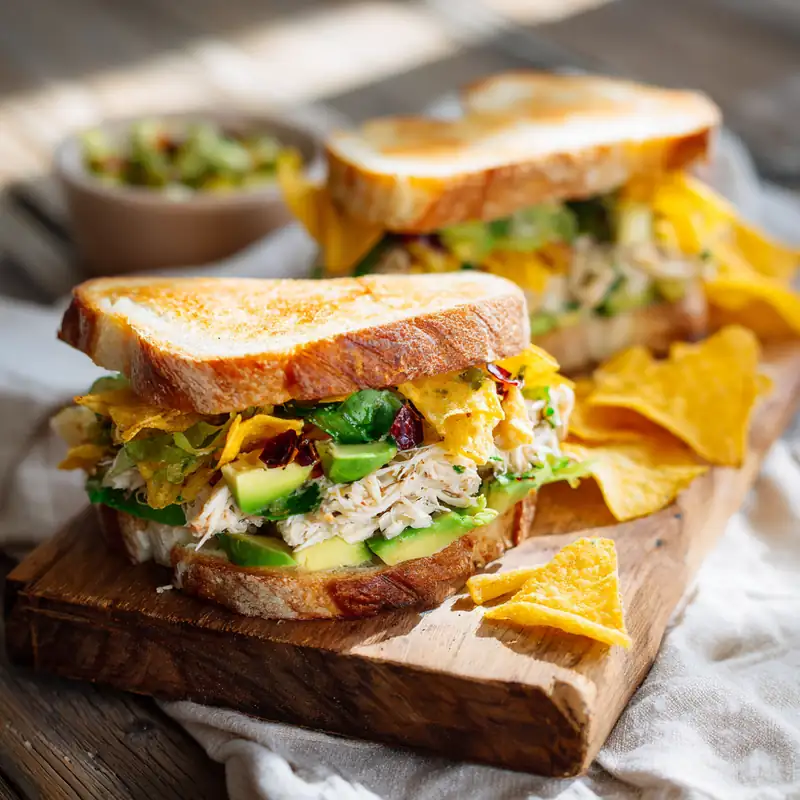
The Kitchen Sink Sandwich lives up to its quirky name. It’s a leftover-powered lunch where you toss together whatever is lying around protein, veggies, cheese, condiments, even snacks like chips, and build a sandwich that surprises you with every bite.
What started as a creative TikTok hack quickly became a viral recipe. A single video with over 4.9 million views showed how fun it can be to turn “random fridge finds” into something mouthwatering. The trend spread fast because it checks all the boxes: easy, affordable, customizable, and photogenic.
The sandwich embodies two ideas people love right now:
Zero waste cooking – instead of tossing small amounts of food, you layer them in.
Playful recipes – TikTok thrives on ideas that feel casual but rewarding, and this sandwich is exactly that.
If you’re into creative lunch ideas, you’ll love this Hot Honey Breakfast Sandwich too, it’s got the same fun, flexible spirit.
Why You Should Try It
There’s a reason the Kitchen Sink Sandwich works beyond its novelty.
Budget-Friendly: You don’t need new ingredients, you repurpose leftovers.
Customizable: Meat-lover? Vegetarian? Gluten-free? The framework works for everyone.
Balanced Meal: When you layer bread, protein, fresh veggies, and a bit of crunch, you get texture and nutrition in every bite.
Creative Fun: Food trends succeed when they’re easy to copy but allow for creativity. Each sandwich is different, no strict recipe required.
This makes it more than a one-week viral lunch. It’s a practical idea you’ll use again and again, especially on busy days. If you’re into building flexible meals, you might also enjoy our Cottage Cheese Taco Bowl for another fridge-clearing win.
Ingredients
While the beauty of the Kitchen Sink Sandwich is flexibility, here’s a template to get you started.
Base Ingredients (for 2 sandwiches):
- 4 slices bread (sourdough, brioche, or multigrain)
- 1 cup leftover cooked chicken, shredded
- ½ ripe avocado, sliced
- ¼ cup shredded cheese (cheddar, mozzarella, or provolone)
- ½ cup fresh veggies (lettuce, tomato, cucumber, or spinach)
- 2 tbsp spread (mayo, hummus, or Greek yogurt)
- ½ cup crunchy add-ins (kettle chips, crushed crackers, or toasted nuts)
- Salt & pepper to taste
Optional Add-Ons:
Pickles or pickled onions, mustard, hot sauce, honey drizzle, fresh herbs.
Looking for more healthy inspiration? Try this Beetroot Lentil Salad as a sandwich side.
Step by Step
Step 1: Toast the BreadStep 1: Toast the Bread
Start by toasting your bread slices until golden and lightly crisped on the outside. This not only enhances texture but acts as a barrier, keeping sauces and juicy fillings from making the sandwich soggy.
Step 2: Prep Your Spread
In a small bowl, mix your choice of mayo, hummus, or Greek yogurt with a pinch of salt and black pepper. For extra flavor, add a dash of lemon juice, a swirl of hot sauce, or even a touch of garlic powder this base will coat your bread and bind all the layers.
Step 3: Dress the Chicken
Take your shredded chicken and toss it in about a teaspoon of the spread to moisten and flavor it. If it’s straight from the fridge, warming it for 15–30 seconds in the microwave helps bring out its tenderness and makes layering easier.
Step 4: Build the Layers
Assemble your sandwich by picking at least one item from each category below. This not only ensures a balanced bite creamy, crunchy, fresh, and savory, but also lets you use what you have on hand without losing structure or taste:
- Base Spread: Add a thin but even layer of your chosen spread to both slices of toasted bread. This locks in moisture and adds tang or creaminess as the flavor foundation.
- Protein: Layer on your chicken or substitute with tuna, turkey, or smashed chickpeas. The protein is your sandwich’s anchor and provides satiety.
- Creamy: Add a few slices of ripe avocado or a smear of cream cheese for richness. This balances drier ingredients and adds mouthfeel.
- Cheese: Use shredded cheese or one solid slice like provolone or Swiss. It helps bind the sandwich together, especially if slightly melted.
- Fresh: Add fresh vegetables like lettuce, tomato slices, or cucumber for a crisp, clean element. They add hydration and brighten the flavors.
- Tart/Sweet: Include something pickled like onions or pickles, or go sweet-savory with a drizzle of honey. This contrast makes each bite exciting.
- Crunch: Top with kettle chips, crushed crackers, or roasted nuts for surprise texture. This unexpected layer often becomes the star.
- Heat (Optional): A drizzle of mustard, chili crisp, or hot sauce brings warmth or spice, depending on your mood. It’s an easy way to dial up flavor.
- Seasoning: Always finish with a pinch of salt and cracked pepper to tie the ingredients together. Even leftovers need seasoning to shine.
Step 5: Top & Compress
Place the second slice of bread on top, spread-side down, and press gently but firmly. This helps the layers settle, especially the crunch, while preventing the sandwich from falling apart when sliced.
Step 6: Slice
Use a sharp knife to slice diagonally, which not only looks great but reveals the colorful cross-section of layers. For meal prep or kid lunches, cut into thirds or quarters and secure with toothpicks if needed.
Step 7: Serve
Serve your Kitchen Sink Sandwich immediately to enjoy the perfect contrast of creamy, crisp, and crunchy textures. It pairs wonderfully with fresh fruit, a light salad, or even Cheesy Potato Folds if you’re in the mood for something warm and comforting on the side.

Variations & Serving Ideas
- Healthy Version: Whole-grain bread, lean turkey, avocado, greens, and nuts
- Kid-Friendly: PB&J with banana slices, pretzels for crunch
- Vegetarian: Roasted veggies + hummus + cheese + seeds
- Party Idea: Make sliders with mini buns, serve with dips
Need more ideas? Our Mediterranean Chickpea Bean Salad is the perfect pairing for a lighter meal.
Storage & Meal Prep Tips
- Best Fresh: This sandwich shines with crunch, so eat soon after assembling.
- Meal Prep: Store fillings in containers. Assemble just before eating to avoid sogginess.
- Lunchbox Tip: Wrap in parchment and keep crunchy elements separate (like chips in a bag).
Pair it with a small container of Sweet Potato Toast for a complete, packable lunch.
Frequently Asked Questions
Q: What is a Kitchen Sink Sandwich?
A: It’s a fun, no-rules lunch trend that started on TikTok, where people create sandwiches using a mix of leftovers, snacks, and fridge finds. The idea is to layer protein, spreads, cheese, fresh veggies, and crunchy elements into one epic, flavor-packed bite.
Q: Why is it called “Kitchen Sink”?
A: The name comes from the saying “everything but the kitchen sink,” and that’s exactly the vibe. You can pile on just about anything leftovers, pickles, sauces, even chips and make it work in a creative, satisfying way.
Q: What can I put in one?
A: Just about anything! Start with a spread like hummus or mayo, add a protein like chicken or turkey, toss in crunchy toppings like chips or nuts, and layer on fresh veggies and cheese. This sandwich is all about making the most of what’s in your fridge.
Q: Is it healthy?
A: It definitely can be. Use whole grain bread, lean protein, and a variety of veggies to keep it balanced. The beauty of the Kitchen Sink Sandwich is that you control the ingredients, so you can make it indulgent or nutritious depending on your goals.
Q: Can I meal prep it?
A: Yes, with one important tip: keep wet ingredients like spreads or tomatoes separate until you’re ready to eat. You can prep the layers in advance and store them in containers, then assemble fresh to preserve texture and avoid sogginess.
Final Thoughts
The Kitchen Sink Sandwich might be trending on TikTok, but it’s more than a passing fad. It’s a smart, fun way to reimagine leftovers, reduce food waste, and enjoy a lunch that feels indulgent but still practical for everyday life.
What makes it great is its flexibility you’re not locked into a recipe. Instead, you’re encouraged to experiment and enjoy a wide range of textures and flavors in a single bite. And yes, it can be part of a healthy eating pattern. Just check out these official dietary guidelines from the U.S. Department of Agriculture to see how balance and variety can fit into meals like this.
Try it once, and you’ll see why millions can’t stop making it. Whether you build it with chicken and avocado, veggies and hummus, or peanut butter and pretzels, the Kitchen Sink Sandwich proves that creativity belongs in the kitchen.
And if you need a high-protein breakfast to match, our Cottage Cheese Banana Pancakes have your back.
Kitchen Sink Sandwich – Easy Viral Lunch That Uses Up Leftovers
Ingredients
Method
- Toast the bread until golden and crisp to help prevent sogginess.
- In a bowl, mix your spread of choice with salt, pepper, and optional lemon juice or hot sauce.
- Toss the shredded chicken with 1 tsp of the spread and warm slightly.
- Spread a thin layer of the base spread on each slice of bread.
- Add protein layer with chicken, tuna, turkey, or chickpeas.
- Add avocado or cream cheese for richness.
- Layer in cheese—either shredded or a full slice.
- Add fresh veggies like lettuce, tomato, or cucumber.
- Top with tart/sweet elements like pickles or a drizzle of honey.
- Finish with something crunchy: chips, nuts, or crackers.
- Optionally drizzle hot sauce, mustard, or chili crisp for heat.
- Season lightly with salt and black pepper.
- Place second slice of bread (spread-side down) and press gently.
- Slice diagonally or into thirds for prep or lunchboxes.
- Serve immediately with fruit, salad, or chips.